Wednesday, February 11, 2009

Paint Part 2

A new year ..... and new metal...... ok maybe not new metal.... but after a lot of sanding it looked all shiny.....

But all that sanding revealed alot of bad and rough spots on the car...... i really wonder what this car could tell me about its history....... The only bad history i know about my car was that on the second day that i owned it.... some idiot reversed into my car and dented the right rear fender pretty badly....

As you can see below..... welder guy is working on that fender before he removed it.

It looks nice in bare metal..... hmmmm...


Rear fender removed...


The roof was the only part that was completely free of any bad spots.... as you can see below, half of which was sanded down........
Check out that white E-type Jaguar and the red lotus on the right..... you can even see the bonet of another E-type behind that mini.... The landi behind my car looks good too but has had alot of panel work done to it...... almost looks ready for paint....

Sanding and more sanding........ wish i could buy painterman a proper mask....

.
.
to be continued......

Tuesday, February 10, 2009

Paint Part1

The car sat in my porch for about six months before i got the courage to commit to a paint job..... then one day i walked into one of the many workshops near were i live (PJS7) and was pretty impressed with the work done by this duo, a painter and body repair welder guy....

After some discussions i strike up a deal and next thing you know they are pushing my car out of my house..... I asked if we didnt have to use a tow truck as the shop is was very close by....


....on the short road to salvation......


...after a long 200 meter push ...we stopped at the 'mamak' (restaurant) to get a drink.... the car was left at the junction and it drew a lot of attention.... luckily didnt cause any accidents...
(All smiles to the shop... even the car looked like it was smiling)
.
....after a refreshing drink in was onward to the paintshop.... the painterman is on the right in green and the body repair guy welder guy is on the left.... The hardworking foreign worker guy in at the back..... (ok enuff picture taking and more helping to push car to shop)....

Let the progress begin.....
.
.

Monday, February 09, 2009

Undersealed and safely back home....

UEP did a good job of undersealing all the relevent area.......


Wheel wells


Rear Luggage area and firewall

Trunk area and spare wheel area.....


Engine bay and fire wall


Front kick panels, floors and underside......
all looks clean and solid.......


All was that was left was the complete metal prep for the shell, primer seal, sanding, final knocking and then a full paint job......

it was mid Jun 2008....... i looked a number of a good painters but the price was very high... it didnt help that it was a complete bare metal strip down.......

So i decided to put the project on hold...... towed it back to the house where it set under a tarp for the next 6 months......

.
.
.
To Be Continued......


Saturday, February 07, 2009

Engine engine engine!!!... what happen to the shell body of the car??

The last time i left you with updates of the shell was that i had removed all the tit bits and the engine.... That was early last year... so what happened after that?... the car painter dude in Klang was not working out... everytime i went there nothing was being done too it.... Then he started saying that the car needs a lot of body work done before he can continue with anything....

It was all a load of BS..!!!.... so i started looking for a new place to do some body work...... I wanted to get the seat rails welded in and also deal with the radio area and delete plate... It was some time in Jun 2008... through a forum member... i decided to send my car to UEP Auto body repair in USJ.


Car being tow from Klang along the Federal Highway....


Finally the car has seats.... vw seats....

experiment gone wrong......


Althought i was okwith most all the welding work.... i wasnt too happy done to the firewall...


To Be Continued.........

Monday, January 12, 2009

Dismantling a 1971 vw 1200cc Engine Part 3

So very sorry for not updating this blog for some time...... well... a number of things have been done on the bug since April 2008...... for instants more things have come off the engine like the pressure plate and clutch plate. Im now stuck with the Gland Nut which is holding the Flywheel.... Dang!!!....
Pressure Plate came off by loosening each nut one by one. Before that i marked a line on it on the flywheel to line it up later 'if' it goes back onto the engine.
hmmm doesnt look too bad.... we will see/...
The flywheel still held together by the 36mm gland nut which you see in the middle of the pic above.
.
I will need to get a cheater pipe which is about 4 feet long to use with my wrench and a angled bar thingy to brace the flywheel from moving. Months and months go by with me not doing anything about it until about a few days before Christmas when i finally bought it. Now i need to call upon all my might to get my ass of this sofa and start on it!!!
.
ANyway while all that was going on (which was nothing much) i had moved my car from KLANG to a welder in Subang Industrial Park for some metal work. The main things done were welding in the seat railings, fixing that hole which is the radio void and delete plate and coat the chasis with underseal.
.
After that i brought it back to my hse where it sat under the porch for a few months....
.
I will blog about all that later........ I promise... :P

Thursday, July 03, 2008

Dismantling a 71 vw 1200 engine Part 2

Back in april... after getting the manifold nut removed i proceeded to soak the bolts which are holding the silencer onto the exhaust manifold... i will need to remove the silencer box so that the whole exhaust and heater box assembly can be removed.....

Before i go into the details... im sure you wld have noticed that the title has 71 written on it instead of 65 ... well i knew that the engine had been changed in my car by the former owners but i never bothered to check the age of my engine.... after checking the Vin number i found it to be an engine made in 1971.... and looking at the number of Brazilian parts on the engine... im guessing it was poorly overhauled.... well maybe not poorly overhauled but definitely not a top overhaul anyway back to dismantling

After soaking it for a week it still did not get loose... i kept soaking it and hitting it with a chisel and hammer hoping it will loosen up ...but nothing... i tried to get a closer look... and found what seem like both the male and female connections had fused together with rust.... then i thought hmmm i might else well put a new Scat system or something like that... basically a new exhaust assembly..... i wanted to keep the heater boxes so used my angle grinder to cut the very tip of the silencer off... as shown below..... as soon ass both sides were cut, .... the whole assembly the came apart easily....

Below is the exhaust assembly.....

Engine looking a little smaller.........

After looking over the engine for no apparent reason.... taking shots in between as i did..... i found a bolt which was missing a nut... its something which is connected with the distributor.... hmmmm i wonder if i had driven 5 years without it........ or did it go missing when my mechanic replaced the contact points and serviced the distributor..... back in 2003??

Thursday, June 26, 2008

BUGgers do Cyberjaya

Woah... the BUGgers club or now known as Volksriders of Malaysia is picking up well.... and our forum is getting more and more lively by the day with over 150 members to date... so if you know anyone who has a classic volkswagen be it a Beetle, Ghia, Kombi, Rabbit, Thing or has a passion on them, get them to join us to learn and share knowledge on the 'Peoples Wagen'.. On behalve of our founder Shawn, i wld like to welcome you to our forum Volksriders

Below is a slide of our 5th G2G held in Cyberjaya last month....

Saturday, May 31, 2008

BUGgers go to PD

A couple of weeks ago a bunch of BUGgers took a day drive to Port Dickson, Negeri Sembilan, Malaysia. We took the old roads through Nilai and Seremban and safely arrived at 10th mile Blue Lagoon, P.D.

It was a pleasant drive there eventhough it rained heavily on the way to Nilai at the start of the journey. I met the guys in Nilai as they stopped for breakfast. Left my car (Satria) there and joined Shawn in his bug as we continued on our journey.

heres a 'few' pixx

Monday, May 05, 2008

4th BUGger's G2G

The BUGgers had a little get together down in Klang end of last month..... 17 bugs turned up... even a fiat 500 turned up.... well it does have its engine in the rear.....

Friday, April 25, 2008

Dismantling a 65 vw 1200 engine Part 1

So i was bored and fiddling around the house and thought hey i think i shall start dismantling my vw engine..... yup just another one of my my wild idea.... so off i went about taking out my tools and dusting off John Muir book 'How to keep you vw Alive'..........

well first thing you need is a 36mm socket..... damn.... i dont have one... so off i went to the hardware shop to buy one......i figured i need to go to big fancy shop to find it but nope... after i went to a few but no luck... the biggest they have is 32mm... i even went to Ace but they didnt have them either.... i finally went to the shop near my house which isnt that fancy....and guess what.... they have a few types!!! but i also need to get a bigger ratchet... :(

ok now to start... Get the 36mm socket onto the that big nut on the fan and a with another hand, get a big/medium screw driver wedged into the slot on the Alternator/Generator to stop it from turning..... once your in position pull on the ratchet to loosen the big nut on the fan... only loosen the nut yah... dont remove it....... as you can see i used a feet on the fan cover for leverage... it was a little tricky trying to keep the generator from moving.......


Ok next, the generator needs to come off.... there is a strap that goes around the generator which you will need to loosen of and get it out of the way... dont bend it too much yah... remove all the bolts on either side of the fan shroud and just pull the whole assembley up and off the engine.. watch the cooling tower which is in side the fan shroud......


I then removed the carburetor which was pretty straight forward.....

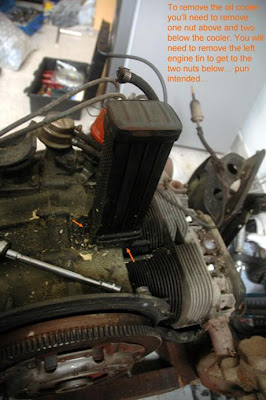
Next i removed the cooling tower. It has one nut on the top of the base and two which are under the base.. you will need to remove the left side engine tin to get to this two nuts....I just went and removed all the engine tin........ Once removed, plug the two holes with a piece of cloth .... yeah i know i dont need to do that since i going to try and dismantle the whole engine but... my engine is pretty dirty with not only grease and oil but alot of loose dirt and dust, paint chips etc etc....

Ok now back to the generator and fan assembly.... Place the shroud on its back with the generator facing up.... Unscrew the four bolts around the fan cover and you will be able to pull the generator and fan out of the fan shroud..........

tada!!!!!! its out......

Ok... now we remove the really big nut we loosened at the very first step earlier..... The fan can be removed now which will expose two more nuts which will remove the fan cover from the generator.


Then i wanted to remove the mufflers..... the one on the right came off after some tugging. You will need to remove the clamps on either side lah.... but the left side muffler didnt budge...... some WD40 here and there and it still didnt move..... somemore WD40 and left over night and it till didnot give up..... well... im not going to give up either.....
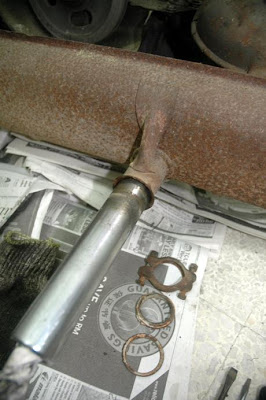

After some thinking... i decided to tighten a hose clamp on the muffler then using a hammer i tamped on the tightening screw of the hose clamp while pulling the muffler with my free hand..... it worked!!!!!! but goosh was it tight.... i had to reposition the clamp three time before the muffler came loose........


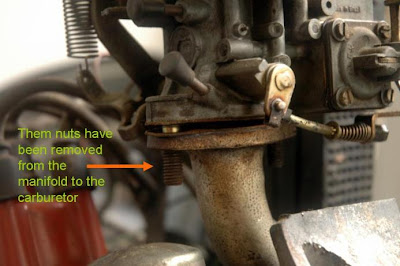
The intake manifold was easy to remove...... all you need to do is remove all four bolts; 2 on each port and 2 one each exhaust..... Then i set out to remove the exhaust which was as simple as the manifold but.... one of the nuts was rusted solid...... tried my best but landed up rounding off the nut.... so i sprayed it with WD40 and tried chipping on it hoping it would turn....... nope ... nothing happened.... so i leave it to soak in WD40 and left it for a week.........

A week later and it still was not budging so ........ out came the hammer and chisel and saw...... the nut was in such a position that i could not reach with any kind of power tool..... sigh..... the finally aafter 2 hours of banging on it with a chisel and sawing the nut....... it came loose/...... but yes ... i damaged the stud... sigh!.........

As you can seen below, theres not much room for me to move about......... but i dont want to risk leaving the engine outside at the back of the house....... not enough someone has stolen my man hole cover.... dont want anyone making of with my engine......


Engine tin after some scrubbing and cleaning.......


End of PART 1

Friday, April 11, 2008

BUGgers & AMC club's Drive to Bagan Lalang

Did you know that there is a stretch of coast at Bagan Lalang which is now called Goldcoast????... sheesh!!! how original wan......

Anyway a bunch of us vw beetle owners and a few other classic car owners took a drive to Bagan Lalang last Sunday.... oh wait do you guys even know where Bagan Lalang is? :) well if you dont its a coastal area just after Sepang Town.... Dont know where Sepang is? ... You know F1 Sepang Circuit ... aaa thats right! its some what a whiles way from there...

It was such a hot day... but of cos it rained like nobodies business later in the evening... luckily i was already back home by then....

i visited Bagan Lalang almost a decade ago.... and boy has it changed.... it used to be a nice quiet place .... the beach wasnt that great but wide...and the water was not too nice either.... but it was a great place for a picnic...... there was a restaurant there which was famous for its 'Ikan Bakar' (Grilled Fish) and the sea food wasnt have bad either....

So yeah ... now ...almost ten years later.... they are calling it Goldcoast.... and they are building a stretch of water villas on stilts... there goes the neighbourhood lah.... the place was packed with visitors .... the roads are alot better but its jammed with cars... maybe because it was a sunday...... there are alot of new stalls along the stretch.... but the food really sucked!... .... .... sigh!!! it was sad lah... i really hope this place is not ruined further by stupid humans who only know how to leave rubbish wherever they go......

Well anyway.... the drive was ok besides some miscommunication, route problems, car problems, etc etc but hey... thats what you get when you bring more then 5 people/cars together right...

more then 10 beetles showed up and about half a dozen classics of other makes from the AMC club joined us..... have a look at the slide show below.... i felt the gathering was pretty good .... maybe the next time will be better if we can iron out some issues.....


Monday, March 31, 2008

BUGgers meet 14Mar08


A bunch of us gathered at Padang Utara in PJ.....