Thursday, March 19, 2009

Paint Part 'Its done!!!'


Went to the shop yesterday cos Luew Yow said he would be done.... but found that he was not happy with a few spots and was tackling it when i got there,,.... you can see by the patches on the bonet and engine lid.....


oooo... check out Knight Rider (the making of).....
Yow said he will be done today and i must say WOW..... i didnt think the colour would be this dark but i like it..... i cant stop smiling....


now to put all the bits together again......... sigh... wish i had a running engine....


Monday, March 16, 2009

Paint Part 10


Black Base Coat........


This is the fenders with one coat of the dark green paint......... cant see the difference :) if you see below ...the inside of the bonet is the black base coat.....

The back is still in black.....

Below.... Mics parts with a single coat of green paint after the black base coat....... Still cant see the green???...... see the last photo .... the rear light housing has two coats of green....


The Green!!! a little more obvious after two coats.... ...... 3 more coats and it will be down..... oh wait theres colour sanding........

Saturday, March 14, 2009

Paint Part 9


The guys primered the car and gave it a coat of gloss to highlight the imperfections. Too bad i wasnt free to take photos of the car after they primered the car...... The gloss coated primer made it look like it was ready to roll out.......... sigh!! ..... its not long now....


More shaping and sanding..... more sanding!!!!

The light well is also being dealt with.....


ooooooooooooo...... so smooth and clean..........


The hood.......


Engine lid.........


Engine bay ...... so clean........... sweet.........


Interior............ im the 'standard interior' is coming along ready nicely.....


.
.
.
TBC

Friday, March 13, 2009

Paint Part 8


The Interior is all smooth now.... nice!!...

Sanding and more sanding....

I didnt know that they would be this maticulus.... even the underside of the hood and engine bonet is being sorted.....


Thursday, March 12, 2009

Paint Part 7


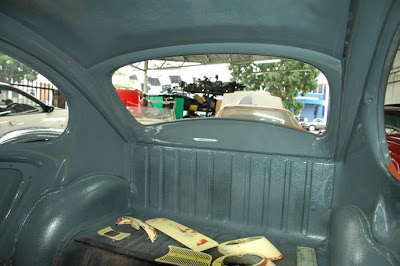
The rear window sill was very badly welder by the last guys who worked on my car the last time. The new guys reworked its and smoothed it all out..... as seen above comparison...

As you have read before.... im redoing the interior to look like a standard beetle.... On a deluxe there are grooves and grips that hold on to the headliner.... since im not having a full headliner, all these will need to go. The comparison below shows the rear of the interior... shaved and smooth...


.
.
TBC

Wednesday, March 11, 2009

Paint Part 6


Some minor metal work (Knocking, welding and grinding) done all over here and there..... The left fender was in terrible shape and i was deciding whether to get a new one or not.... but they seem to have knocked it out the best they could. Getting a new fender would surely be over my budget..... even a secondhand one cost more then RM 150... not more then RM200.


The A pillar window sill was reworked.... no more holes....

.
.
.
.
TBC


Monday, March 09, 2009

Paint Part 5


I decided to make the interior of my beetle to look like a Standard Beetle interior. Actually i am planning to only have a single roof headliner installed. So all the other areas of the interior which is normally covered with headliner material will be exposed painted metal.

So the guys at the shop have more work to do... like smooth out the whole interior......


All the grooves that whole the headliner has been shaved and later smoothed out..

As seen below.... the ex-owner had jabbed and drilled holes to screw the sunvisors into placed....SIGH!!!.... im not sure what to do yet.......
.
.
tbc

Sunday, March 08, 2009

Mo's Beetle's friend all painted all....


Remember the landie that was keeping my car company.... and even carried some of its part for a few weeks..... who gave up its time in the boot so that my car could be rust proofed....

well as you can see by the photos... is has been painted... not a colour i would pick for a landie but it still looks cool........


Wednesday, March 04, 2009

Dismantling a 1971 vw 1200cc Engine Part 5


ok after getting the flywheel off i then started taking the generator stand, fuel pump and distributor off of the engine... which was only unbolting some bolts and thats all...
alamak! the desciption in the photo is wrong.... its generator stand not Oil Filter....

ok ... now i can stand taking the heads out... first unclip the Valve cover.... you will be in full view of the rocker assembly... unbolt the two nuts on in as seen below and carefully take the whole thing out and bag it...

Take the push rods out and bag it.... u can test if they are any good by rolling in on an even surface.... if they roll funny you will need a new set....

The push rods....
Now, unbolt the 8 bolts, 4 on the inside of the Vavle area and 4 out side on the head.... Loosen all the bolts first before going at them fully.....then slowly pull the head off... give it a little tap with a mallet or your palm but be carefull not to damage the fins....
Becarefull of the push rod tube if you want to keep them.... im going to replace them completely with new push rods tube seal too...
closeup of the heads....
i dont know if you can see in this photo below.... there is a deflector plate which is clipped on onto the cylinders.... this pieces is very important in keeping the air circulating around the cylinders... it is on only the left cylinders.... if you dont have one i suggest you get it....
After unclipping it you can now slid the cylinders of.... again you may need the mallet but be very very very carefull to not damage the fins.... While the cylinders slowly come off... make sure that the pistons do not just drop out of the cylinders.... take care not to damage it.... especially if it is in good condition and you plan to keep it.

Ok ....this is where im at with the engine........ i will need to clear some time to remove the pistons next....


.
.
.
to be continued